Sign Mounting Fastener Suggestions

A PDF version of these suggestions is available for downloading and printing.
Download Fastener Suggestions (PDF)
Download Fastener Suggestions (PDF)
Raceway Sign to structure:
- Stucco Wall - with Foam/Wood Backing : Attach through the top Tab, minimum 2ct.- ⅜” through Bolts or All Thread all the way through the wall and through backing plate inside wall. Additional ⅜” Lag Bolts, every 30” across bottom and top. Signs over 30” tall change the ⅜” Lag Bolts to ½” Lag Bolts. Be sure to put a flat washer between the head of the lag and the raceway flange.
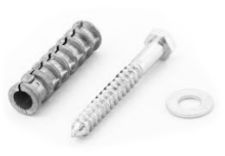 Masonry Wall : Through the top tab and bottom tab, install ⅜” x 3” Lags and Shields every 30”, with at least 2 in each raceway section top and bottom. Signs over 30” tall change the ⅜” Lag Bolts to ½” Lag Bolts. Be sure to put a flat washer between the head of the lag and the raceway flange.
- Wooden Wall : Through the top Tab and bottom tab, install 3/8” x 2.5” Lag Bolt or Large Screw every 30”, with at least 2 in each raceway section top and bottom.. Additional through bolts will be needed if the wood surface is not thick enough or does not sufficiently resist pulling the lags out. Signs over 30” tall change the ⅜” Lags to ½” Lags. Be sure to put a flat washer between the head of the lag and the raceway flange.
- Roof Mount - with SignMonkey.com Roof Mount Brackets : When mounting through a roof, sealing the penetration for water infiltration is very important. The sign should also be mounted high enough to not have leaves or snow pile up behind it. The Bracket should be mounted down to the roof with ½” through bolts and a Backing plate between the rafters on the inside of the building. Attachment points at the front and rear of the Sloped Roof Mount Bracket.
EZLit Direct Mount Sign &Self Contained Lit Shape Signs to structure:
- Stucco Wall : Letters or logos under 6 square feet can be installed with #10 weather resistant wood screws through the mounting tabs. The screws must penetrate the wood substrate behind the foam and the wood must be strong and thick enough to resist the pullout of the screws. For signs over 6 square feet we suggest at least 2ct - ⅜” through bolts with backing material on opposite side of wall. Mounting should be through the included mounting tabs or alternately through the back of the sign. (requires removing the sign face) The remaining mounting tabs should have #10 wood screws.
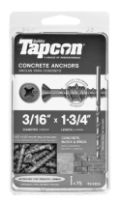 Masonry Wall : Letters or logos under 24” tall could be mounted with 3/16” TapconsⓇ, mounting through the Clear mounting tabs. We suggest painting the TapconsⓇ with wall colored spray paint prior to installation.
 Letters and logos larger than 24” and with Metal Mounting Tabs should be installed with ¼” x 3” drive Pins, one through each mounting tab or alternately through the back (requires removing the sign face)
- Wooden Wall : Letters or logos under 6 square feet can be installed with #10 weather resistant wood screws through the mounting tabs. The screws must penetrate the wood substrate behind the foam and the wood must be strong and thick enough to resist the pullout of the screws. For signs over 6 square feet we suggest at least 2ct - ⅜” through bolts with backing material on opposite side of wall. Mounting should be through the included mounting tabs or alternately through the back of the sign, (requires removing the sign face) The remaining mounting tabs should have #10 wood screws.
SignMonkey.com does not guarantee our installation fastener suggestions will meet your local building codes or be sufficient for your conditions. Your structure or potential weather conditions must be considered when choosing a fastener. You must use your own judgment and follow your local building codes. If you are not sure of your mounting requirements consult a structural engineer.